
Learn what counts as wind damage, what to document in the first 72 hours, what to expect from the adjuster, and how to avoid scams or scope gaps that lead to surprise costs.
Quick navigation
- What Counts as Wind Damage (and What Doesn’t)
- First 24–72 Hours: Safety, Documentation, and Temporary Protection
- Wind Damage Documentation Checklist
- What Fails First in Western Washington Wind Events
- What to Expect in the Insurance Claim Process
- Storm Scams and Red Flags to Avoid
- Repair vs Full Replacement After Wind Damage
- How to Compare Bids and Scopes (Storm Repair or Replacement)
- When to Call a Professional
- If Replacement Becomes the Right Move
- Ready to Document and Move Forward?
- FAQ
Wind events in the North Sound and coastal areas can lift shingles, tear flashing, and expose weak transitions that were already marginal. Filing a claim isn’t automatic, and coverage depends on your policy, the cause of loss, and what the adjuster can verify. Here’s how to document damage correctly, set realistic expectations, and avoid the most common mistakes homeowners make in the first 72 hours.
What Counts as Wind Damage (and What Doesn’t)
Insurance policies typically cover “sudden and accidental” damage from a specific storm event. That’s different from wear and tear or a roof that was already failing.
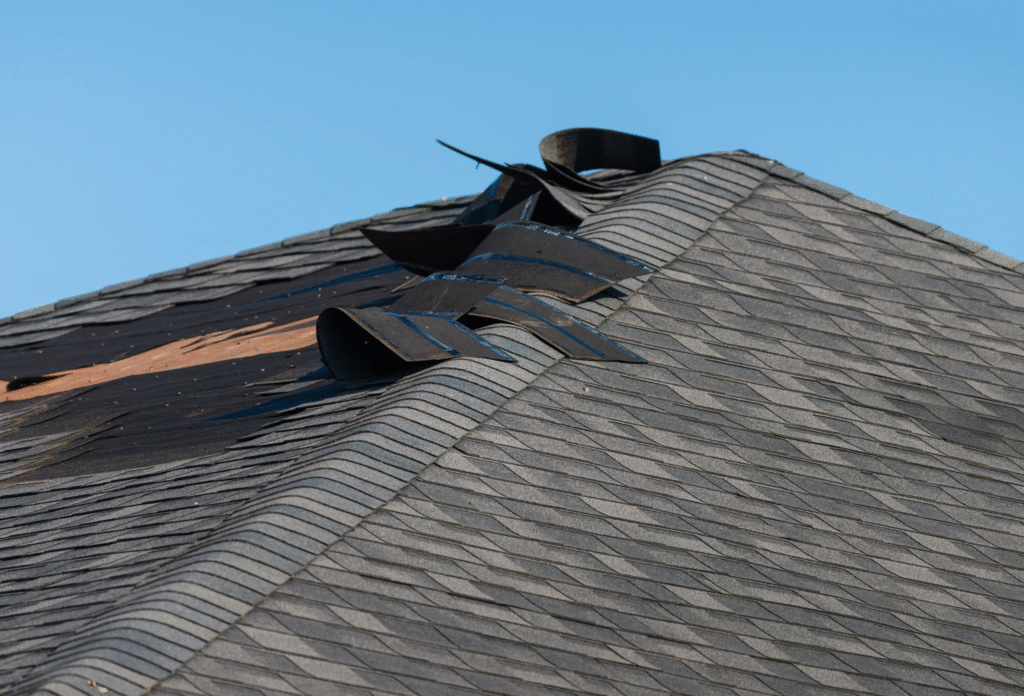
Wind damage means shingles that were properly installed got lifted, creased, or torn off because of wind forces during a documented storm. It means flashing pulled away, vents broke loose, or debris impacted the surface.
It doesn’t mean shingles that were brittle and curling finally gave up. It doesn’t mean granule loss from 15 years of UV exposure. And it doesn’t mean a system that was near end-of-life decided to leak during a rainstorm.
Adjusters look for patterns. If the damage is concentrated at edges, ridges, or one exposure, and it matches the storm’s wind direction, that supports a covered event. If it’s scattered wear across the entire roof with no clear storm signature, that’s a tougher claim.
Your coverage depends on your policy language and the adjuster’s findings. No contractor can promise approval.
First 24–72 Hours: Safety, Documentation, and Temporary Protection
The first three days after a storm are critical. You need photos before anything gets moved or repaired.
If you have an active leak, you can tarp or place buckets to prevent further interior damage. That’s reasonable mitigation. Most policies expect you to prevent additional harm.
But don’t let anyone start pulling shingles, replacing sections, or “cleaning up” before you document everything. Once the evidence is gone, you’re relying on someone’s word about what was there.
Take wide shots of the whole roof from the ground. Take close-ups of any lifted shingles, missing pieces, dents in vents, or torn flashing. Photograph fallen branches or debris that hit the roof.
Walk the interior and look for stains, wet insulation, or drips. Take photos. Note the date and time, and write down when the storm happened and what you noticed afterward.
If a contractor shows up offering to tarp your roof, that’s fine. But if they want to start repairs or ask you to sign an agreement before the adjuster arrives, slow down. You need documentation first.
Wind Damage Documentation Checklist
Here’s what to capture before the adjuster visit:
- Wide shots from all four sides of the house (shows overall condition and context).
- Close-ups of any lifted, creased, missing, or damaged shingles.
- Date and time stamps if your phone supports it, or notes with approximate timing.
- Storm date and observations — when did the wind hit, what did you hear, when did you notice the damage.
- Interior signs — ceiling stains, wet insulation in the attic, water spots on walls, drips during or after the storm.
- Fallen debris — branches, tree limbs, anything that impacted the roof.
- Pattern photos — edges, ridges, valleys, and transitions where wind typically attacks first.
The more complete your documentation, the clearer the claim. You’re not trying to exaggerate. You’re showing what actually happened so the adjuster can make an informed decision.
What Fails First in Western Washington Wind Events
In the Pacific Northwest, wind-driven rain and coastal exposure create specific weak points. Here’s what typically gives out first during a windstorm:
Edges and eaves — Wind gets under the shingles here and lifts. If the starter strip wasn’t fastened correctly or the adhesive aged out, the first course peels back.
Ridges and hips — Cap shingles take direct wind exposure. If fasteners are marginal or the caps are old, they blow off.
Starter strip and first course — These are supposed to seal down and resist uplift. If they don’t, wind drives under the field shingles.
Lifted shingles with creases — Once a shingle lifts and creases, it won’t reseal. It becomes a permanent weak point.
Flashing at walls and chimneys — Step flashing and counter flashing can pull away if not mechanically fastened or if caulk was the only thing holding them.
Vents and pipe boots — Plastic vents crack. Old boots tear. Wind can rip these loose or let water in around the base.
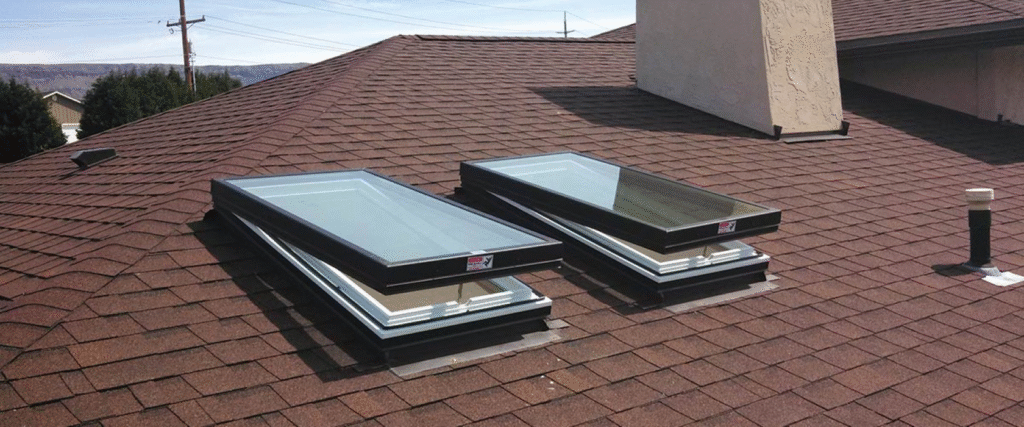
Skylights and their curbs — If the flashing wasn’t done right or the curb is rotted, wind-driven rain gets in.
Gutters and downspouts — Debris impact or wind forces can pull these loose, and once they go, water management fails.
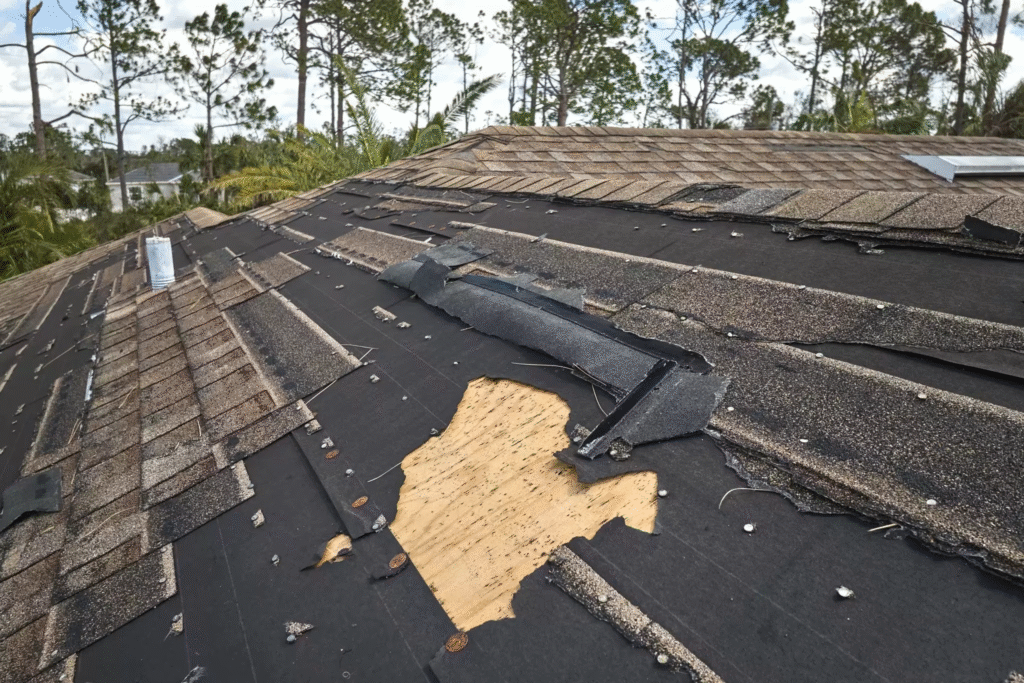
Underlayment exposure at transitions — Valleys, sidewalls, and rake edges are where underlayment gets tested. If it’s torn or missing, leaks follow.
In places like Oak Harbor or along the coastline, wind doesn’t just blow. It drives rain horizontally into every gap. That’s why edges and transitions fail first, and why repairs need to address the system, not just the visible damage.
What to Expect in the Insurance Claim Process
Filing a claim starts with a call to your insurance company. They’ll assign an adjuster who will schedule a visit to inspect the damage.
The adjuster’s job is to determine if the damage matches a covered event under your policy. They’ll take their own photos, measure the affected areas, and write a scope of work.
That scope might not match what your roofing contractor recommends. Adjusters often start with a repair-only approach, especially if the damage is localized. Contractors may recommend replacement if the roof is near end-of-life or if multiple weak points exist.
If there’s a gap, your contractor can write a supplement — additional documentation explaining why more work is needed. The insurance company reviews it and may approve additional items. This back-and-forth is normal.
You’ll also see depreciation and holdback on your initial payment. Insurance pays actual cash value first (replacement cost minus depreciation), then releases the holdback once work is completed. The numbers vary by age of roof and policy terms.
Timelines depend on the carrier, the size of the storm, and how many claims they’re processing. In a major wind event across the Everett area or North Sound, it can take weeks to get an adjuster out.
Set realistic expectations. Coverage is not guaranteed. Approval depends on findings, policy language, and whether the damage fits the covered event definition.
Storm Scams and Red Flags to Avoid
After a windstorm, door knockers show up. Some are legitimate local contractors. Some are not.
Here’s what to watch for:
High-pressure tactics — “We’re only in the area today” or “Sign now or we can’t help you” are red flags. Legitimate contractors don’t operate this way.
“Free roof” promises — No roof is free. If someone says insurance will cover everything and you won’t pay anything, they’re either inflating the claim, cutting corners, or both.
Confusing agreements — Assignment of benefits, net-zero contracts, or documents that give the contractor control of your claim should be reviewed carefully. You want to stay in control of your own claim.
“We’ll cover your deductible” — This is often illegal and a signal that the contractor plans to pad the scope or cut quality to make up the difference.
No local address or license info — Storm chasers move from region to region. If they can’t provide a local business address, a license number, or references, walk away.
A trustworthy contractor will inspect, document, give you a clear scope, and let you make the decision. They won’t pressure you to sign before you’ve talked to your insurance company.
Repair vs Full Replacement After Wind Damage
Sometimes a repair makes sense. If the wind damaged a small section, the rest of the roof is in good shape, and you can match shingles, a targeted repair is the rational move.
But if the roof is 15+ years old, you’ve had multiple repairs in different spots, and now a windstorm exposed three or four new weak points, replacement starts to make more sense than chasing failures.
Here’s the logic: a repair fixes what broke this time. It doesn’t fix the underlayment that’s deteriorating, the flashing that’s marginal, or the next ridge cap that’s about to let go.
If the adjuster’s scope shows localized damage but your contractor is recommending replacement, ask why. A good contractor will explain the condition of the overall system, show you photos of what’s marginal, and let you decide.
If the insurance company approves a repair and you choose to replace, you’ll pay the difference. That’s your call. But you should understand what you’re getting for that money — a system that’s rebuilt correctly vs a patch on an aging roof.
If you are weighing whether the roof is nearing end-of-life, see Signs It’s Time to Replace Your Roof Before It Leaks.
How to Compare Bids and Scopes (Storm Repair or Replacement)
Whether you’re repairing storm damage or replacing the roof, the scope matters more than the price. Here’s what to look for:
Flashing details — Does the estimate specify step flashing, counter flashing, chimney cricket, wall flashing? Or does it just say “flashing as needed”?
Underlayment and ice & water placement — Where is ice & water shield going? Eaves, valleys, sidewalls, penetrations? Is synthetic underlayment specified or just felt?
Decking inspection and replacement plan — Will they inspect the decking and replace rotted or damaged sections? Is there a line item and allowance, or is it ignored?
Ventilation impacts — If they’re replacing the roof, are they addressing intake and exhaust balance? Ridge vent, soffit vents, attic ventilation strategy?
Cleanup and haul-away — Is debris removal included? Dumpster, magnetic sweep, tarp protection for landscaping?
Documentation and photos in the estimate — A good contractor will include photos of current conditions and explain what they found. If the estimate is just line items and no context, that’s a red flag.
Red flags:
- Vague descriptions like “roof repair” with no detail.
- No measurements or quantities.
- Pressure to sign immediately.
- Price significantly lower than others without explanation.
- No mention of permits (if required) or manufacturer specs.
The goal is to compare scope, not just price. A lower bid that skips flashing, underlayment, or decking will cost you more in callbacks and failures.
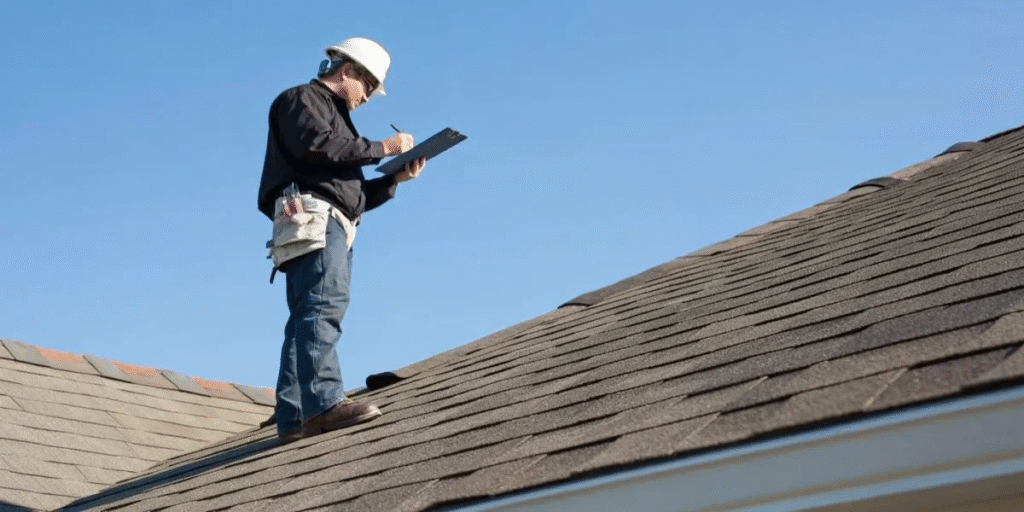
When to Call a Professional
You should call a roofing contractor if:
Safety is a concern — Active leaks, sagging areas, or visible structural damage mean you need an inspection now, not later.
Widespread lifting or multiple failure points — If shingles are lifted in several areas, or you’re seeing damage at edges, ridges, and valleys, the system is compromised.
Roof age plus storm event — If your roof is over 12–15 years old and just took a hit, it’s worth having someone look at the overall condition, not just the storm damage.
Repeated repairs in the same spots — If you’ve patched the same valley, the same flashing, or the same ridge multiple times, the underlying issue isn’t being addressed.
A good inspection should give you:
- Photos of current conditions (wide shots and close-ups of problem areas).
- Findings — what’s failing, why it’s failing, and whether it’s storm damage or wear.
- Options — repair vs replace, material choices, scope differences, and cost ranges.
You’re not obligated to hire the inspector. You’re gathering information so you can make an informed decision and speak clearly with your insurance company.
If Replacement Becomes the Right Move
If you decide to replace the roof, whether insurance covers it or you’re paying out of pocket, think about it as a system, not just shingles.
Asphalt and metal are two different approaches. Asphalt is a proven, affordable option that works well in most residential applications. Metal, especially standing seam, is a premium system designed for high-wind, high-moisture environments.
In exposed coastal areas or homes with repeated wind issues, metal’s mechanical seams and fastener-free surface can make sense. But it’s not the right fit for every home or every budget.
If you’re comparing options, focus on how the system is installed, not just the material. Why roofs fail in the Pacific Northwest often comes down to details — flashing, underlayment, ventilation, and transitions.
A good contractor will explain the tradeoffs and let you choose based on your situation, not push you toward the highest-margin product.
Ready to Document and Move Forward?
If you’re dealing with wind damage, we can inspect, document what we find with photos, and give you a clear scope so you’re not guessing when you speak with your insurer.
We count everything. We explain what matters and why. And we give you options, not pressure.
Schedule an inspection and we’ll walk you through what we’re seeing and what makes sense for your situation.
FAQ
Will insurance pay for a full roof replacement after wind damage?
It depends on your policy, the extent of damage, and the adjuster’s findings. If the wind damaged a localized area and the rest of the roof is in good condition, they’ll likely approve a repair. If the damage is widespread or the roof was already near end-of-life, replacement may be covered. But there’s no guarantee. Coverage is determined by the adjuster and your policy terms.
What if my roof is older — will they deny the claim as wear and tear?
Age alone doesn’t disqualify a claim, but it does affect how adjusters evaluate damage. If the storm caused new damage to a roof that was otherwise functional, that can still be covered. But if the roof was already failing and the storm just exposed existing problems, the claim may be denied or reduced. Documentation showing a clear before-and-after from the storm event helps.
Do I have to use the insurance company’s preferred contractor?
No. You have the right to choose your own contractor. The insurance company may have a preferred vendor list, but you’re not required to use them. Just make sure whoever you hire can document their work, provide a detailed scope, and work with the insurance process if needed.
Can I start repairs before the adjuster comes?
You can do temporary emergency mitigation like tarping to prevent further damage, and most policies expect that. But don’t start permanent repairs or remove damaged materials before the adjuster documents everything. Once the evidence is gone, it’s much harder to support your claim.
Is it worth filing a claim for minor wind damage?
It depends on your deductible and the cost of repair. If the damage is $800 and your deductible is $1,000, filing doesn’t make sense. If the visible damage is minor but you’re concerned about hidden issues, get an inspection first. A contractor can give you a repair estimate, and you can decide whether to file based on real numbers.
How do I avoid getting stuck paying more than expected?
Get a detailed scope from your contractor that matches what the adjuster approved. If there’s a gap, ask for an explanation and a supplement. Understand depreciation and holdback so you’re not surprised by the initial payment. And don’t sign agreements that give the contractor control of your claim or promise to waive your deductible.
What’s the difference between actual cash value and replacement cost?
Actual cash value (ACV) is replacement cost minus depreciation based on the age of your roof. Replacement cost is the full cost to replace it with new materials. Most policies pay ACV first, then release the depreciation holdback once repairs are completed. Check your policy to see which coverage you have.
What should I do if the contractor’s estimate is way higher than the adjuster’s scope?
Ask the contractor to explain the difference. Sometimes it’s because the adjuster missed items or didn’t account for hidden damage. Your contractor can write a supplement with photos and documentation to request additional coverage. If the gap is legitimate, the insurance company will often approve it. If the contractor is padding the scope, you’ll see vague line items and pressure to sign quickly.